Building Java from Scratch with Tekton-CI
In a bonus post, I’ll show how Tekton-CI makes getting from a starter project to building images quickly easier!
Start at Spring.io
First of all, start by generating a simple project at start.spring.io.
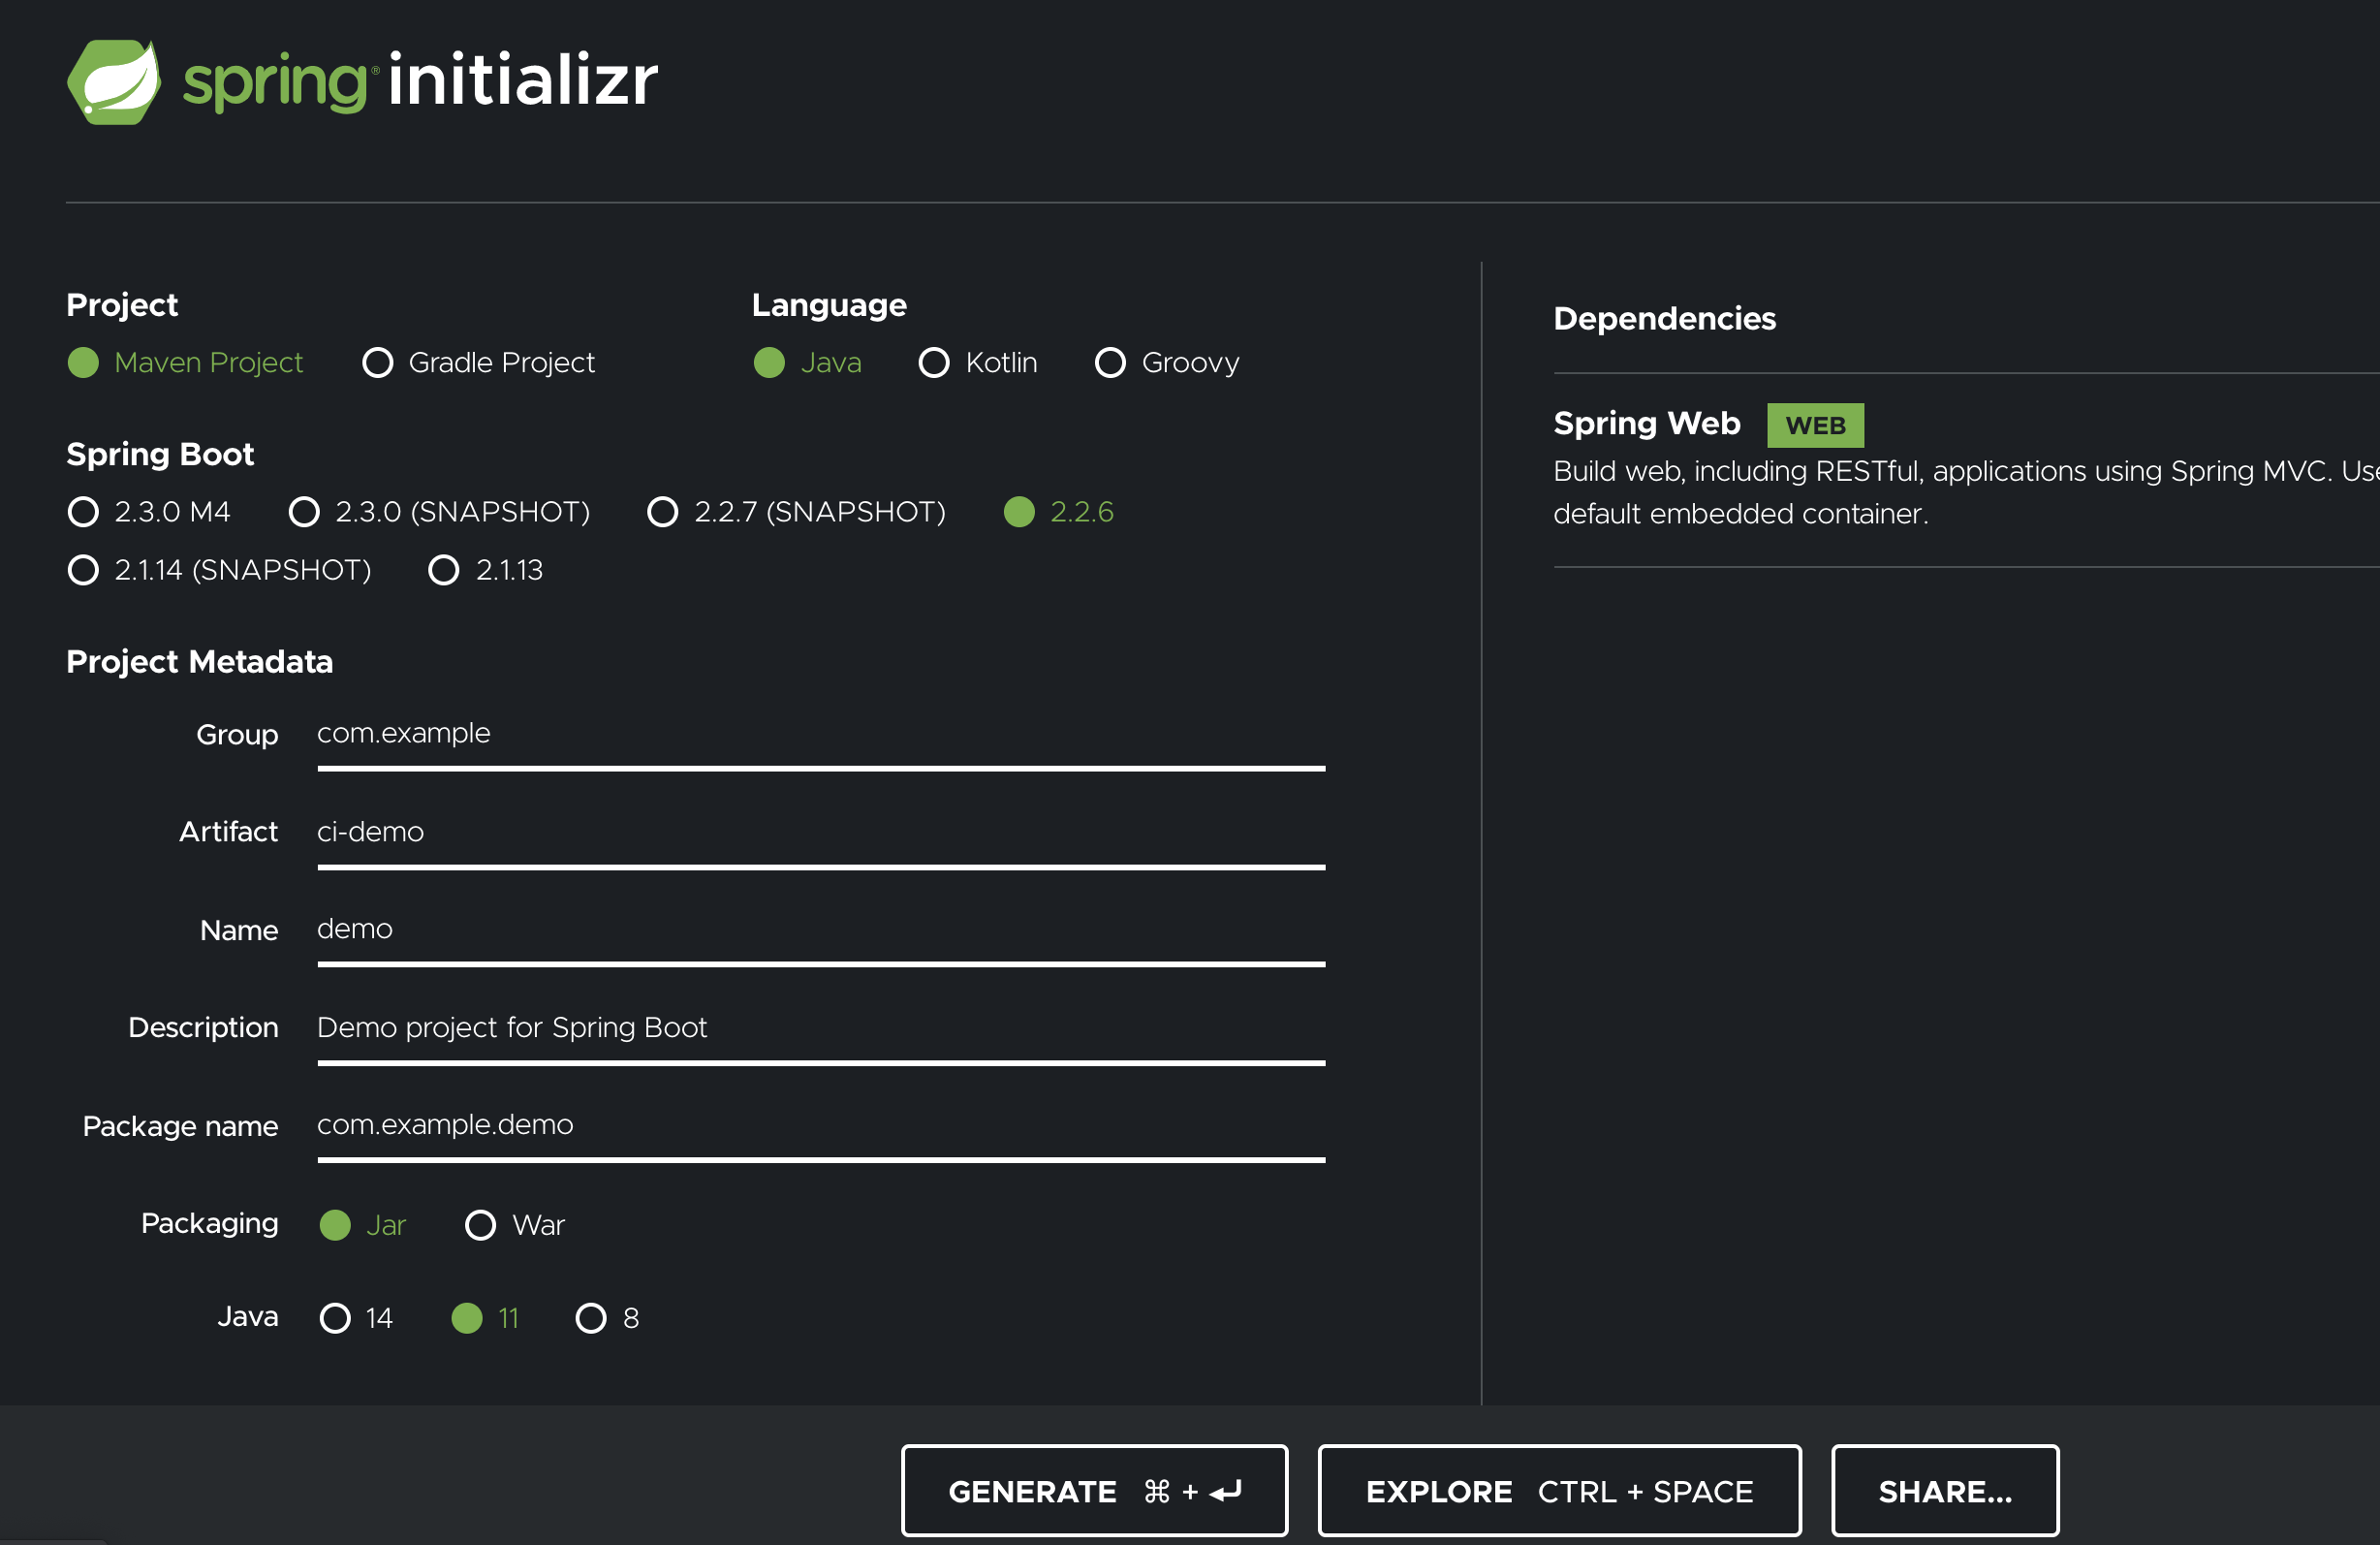
The only dependency here is “Spring Web”, and it’s configured to use Java 11 and not Java 14.
I called my project ci-demo.
A Dockerfile
Download your project, and unzip it to your normal working source directory.
FROM adoptopenjdk/openjdk11-openj9:jdk-11.0.7_10_openj9-0.20.0-alpine AS build
COPY . /build
WORKDIR /build
RUN ./mvnw clean package

FROM adoptopenjdk/openjdk11-openj9:jre-11.0.7_10_openj9-0.20.0-alpine
WORKDIR /root/
COPY --from=build /build/target/ci-demo-0.0.1-SNAPSHOT.jar .
EXPOSE 8080
CMD ["java", "-jar", "ci-demo-0.0.1-SNAPSHOT.jar"]
Drop this really simple Dockerfile into the root of your project, you might
need to change the name of the target SNAPSHOT file, if your project has a
different name.
The CI file
And write this .tekton_ci.yaml alongside the Dockerfile.
build-image:
  rules:
    - if: vars.CI_COMMIT_BRANCH != 'master'
      when: never
  tekton:
    taskRef: buildah
    params:
     - name: IMAGE
       expr: "'quay.io/bigkevmcd/java-demo:master-' + vars.CI_COMMIT_SHORT_SHA"
This simply says to trigger a build on pushes to master, using the Buildah task, and push to my image repository, change the image repository to one you have access to.
This is a fairly complete guide to the currently supported syntax.
Create a GitHub repository
Create a GitHub repository for your new project.
Next we’ll prepare the Kubernetes cluster, this may look like a lot of steps, but they’re mostly one-offs.
Prepare your Kubernetes cluster
Install Tekton Pipeline
NOTE: These will work with the Tekton Pipelines Operator, as long as it supports a recent Tekton Pipeline release (v0.11+).
$ kubectl apply -f https://github.com/tektoncd/pipeline/releases/download/v0.11.3/release.yaml
Install the Buildah Task
$ kubectl apply -f https://raw.githubusercontent.com/tektoncd/catalog/v1beta1/buildah/buildah.yaml
Create a secret for pushing the image
Pushing images to repositories requires authentication, this is the same as the configuration for pulling private images.
You’ll need a Docker config.json file, Quay.io (which is what I use) allows you to generate these
from the Account Settings page.
$ kubectl create secret generic regcred \
    --from-file=.dockerconfigjson=<path/to/.docker/config.json> \
    --type=kubernetes.io/dockerconfigjson
Configure the Git client for access to GitHub
Generate a GitHub access token and create a secret for this.
$ kubectl create secret generic tekton-ci-client \
  --from-literal=token=GENERATE_ME
Configure the shared secret to authenticate incoming GitHub webhooks
Authenticating the origin of incoming hooks is essential for build processes, otherwise a hacker could drive a build of any code on the same Git Hosting Service, and have it pushed with your credentials to an image.
$ kubectl create secret generic tekton-ci-hook-secrets \
  --from-literal=bigkevmcd_java-ci-demo=test-secret
The literal bigkevmcd_java-ci-demo is made from your repository name you
created earlier, but instead of username/my-repo, you need to replace the /
with an _ (underscore).
Also, don’t use test-secret, use the method that GitHub recommend.
At this point, your Tekton installation is nearly complete, you will need to
install the tekton-ci service.
Install Tekton-CI release
$ kubectl create -f https://github.com/bigkevmcd/tekton-ci/releases/download/v0.1.0/release-v0.1.0.yaml
And grant access to this secret to the service account created in the Tekton CI release.
$ kubectl patch serviceaccount tekton-ci \
  -p '{"secrets": [{"name": "regcred"}]}'
And you’ll need to expose the tekton-ci-http service to the Internet.
For local testing, you can use ngrok http 8080 and kubectl port-forward svc/tekton-ci-http 8080 but this can vary a lot, so as long as GitHub can hit your endpoint, you should be fine.
Phew, that is a lot of steps, but…we’re nearly there.
Your first build!
At this point, the cluster is ready, we just need to finish off our repository, and push the code.
Create a Webhook
Follow the GitHub instructions to create a Webhook in the repository you created earlier.
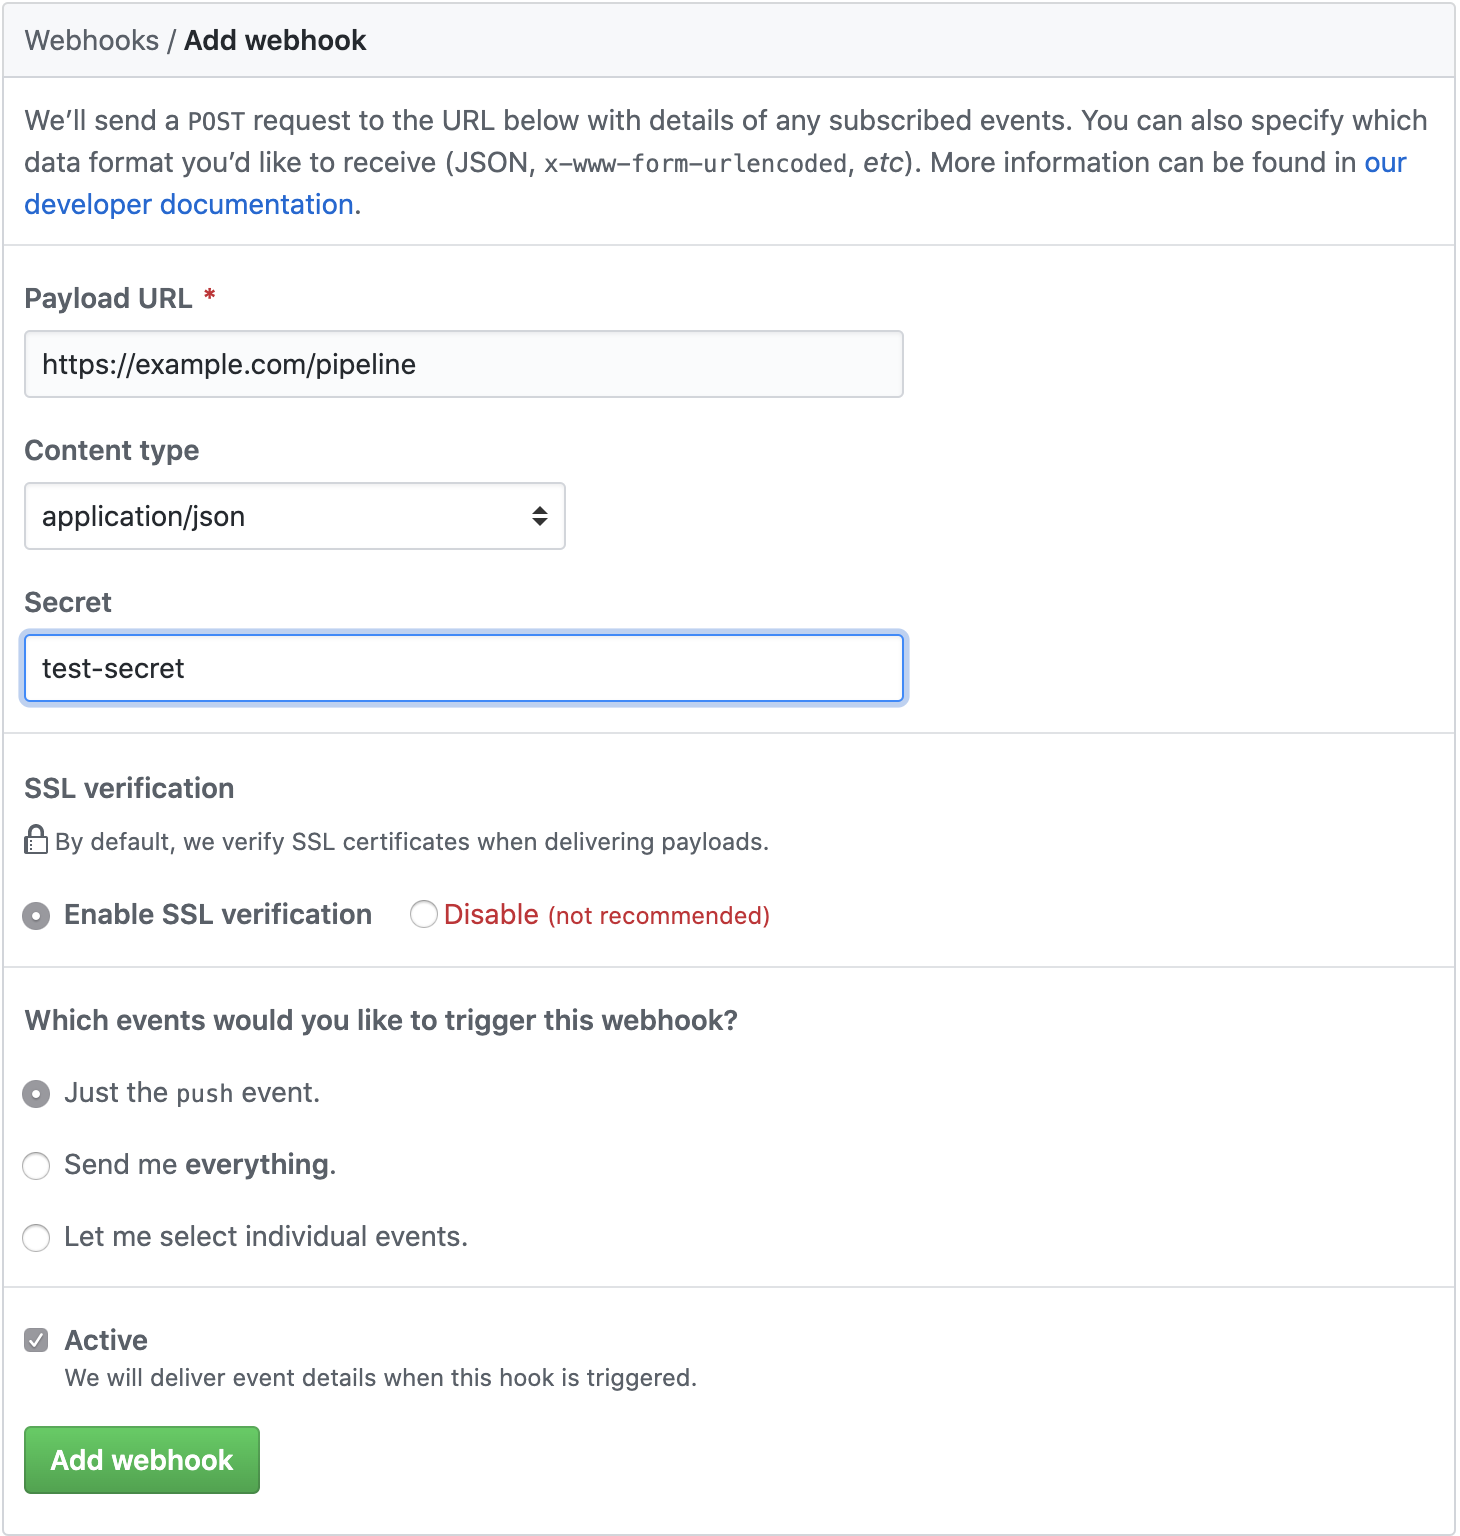
Replacing the example.com and secret with your entry point, and the secret you generated above.
Note that the Payload URL must use the path /pipeline to hit the DSL endpoint.
Push the code!
Back in your newly created Java project directory you’ll need to go through the standard Git repository creation and pushing.
$ git init .
$ git add .
$ git commit -m "first commit"
$ git remote add origin https://github.com/<username>/<project>.git
$ git push -u origin master
Remember to change the origin to point at your newly created project.
At this point, GitHub should have sent a webhook notification, and your pipeline should be building.
$ k logs deploy/tekton-ci-http
{"level":"info","ts":1588229548.0086856,"caller":"dsl/dsl_handler.go:73","msg":"processing push event","repo":"bigkevmcd/ci-java-demo","sha":"d54d1374039e563b3c6ab89b072a21a397031fc7"}
{"level":"info","ts":1588229548.3602788,"caller":"dsl/scripts.go:52","msg":"converting pipeline","volumeClaimName":"simple-volume-2wj99","ref":"d54d1374039e563b3c6ab89b072a21a397031fc7","repoURL":"https://github.com/bigkevmcd/ci-java-demo.git"}
{"level":"info","ts":1588229548.3603444,"caller":"dsl/scripts.go:60","msg":"processing stage","volumeClaimName":"simple-volume-2wj99","ref":"d54d1374039e563b3c6ab89b072a21a397031fc7","repoURL":"https://github.com/bigkevmcd/ci-java-demo.git","stage":"default"}
{"level":"info","ts":1588229548.3603637,"caller":"dsl/scripts.go:64","msg":"processing task","volumeClaimName":"simple-volume-2wj99","ref":"d54d1374039e563b3c6ab89b072a21a397031fc7","repoURL":"https://github.com/bigkevmcd/ci-java-demo.git","task":"build-image"}
{"level":"info","ts":1588229548.4102612,"caller":"dsl/dsl_handler.go:130","msg":"completed request"}
You should see something like this in the logs, and if you have tkn installed.
$ $ tkn pipelinerun list
NAME                     STARTED          DURATION    STATUS
test-pipelinerun-s8z2f   6 seconds ago    ---         Running
Once it completes, the image should be pushed to your image repository.
Debugging Tip
You can go to your GitHub project’s Webhooks, and see the pushed hooks, and the response from your server, this can be useful if for example the URL is wrong, or maybe your port is incorrect at the Kubernetes end.
https://github.com/<username>/<project>/settings/hooks/
If you click on a hook, there’s a Recent Deliveries section, which can be expanded, and, really usefully, you can request a redelivery of the hook events.
You should see the X-GitHub-Event: push event in the list.